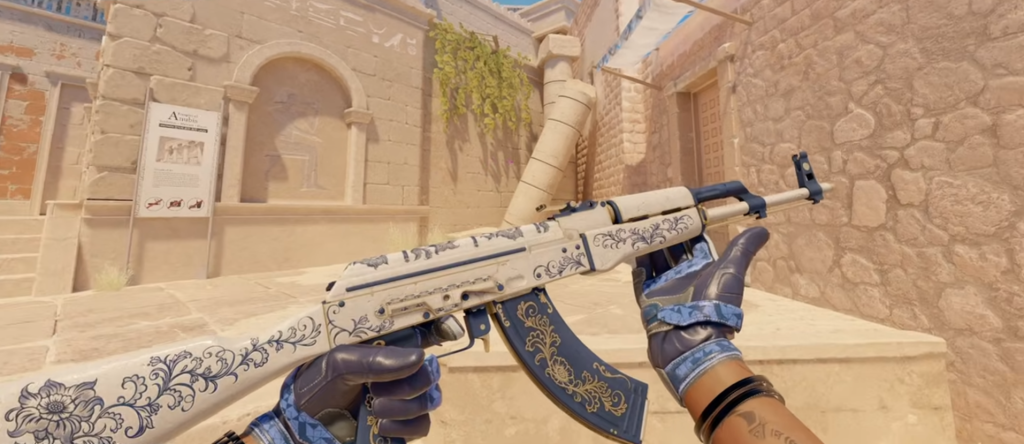
Your viewmodel is the weapon model sitting in the corner of your screen during every single round. Most players never touch the defaults. That’s a mistake, because the default position puts more gun on screen than necessary, and that obstructs sightlines during peeks. Getting your CS2 viewmodel settings dialed in is one of the fastest, lowest-effort improvements you can make to your setup.
What Viewmodel Settings Actually Control
Viewmodel settings control how the weapon model is positioned and sized on your screen. They have zero impact on gameplay mechanics like spread, recoil, or bullet registration. What they do affect is visibility: how much of your screen the gun occupies, where it sits relative to your crosshair, and how much it obstructs your view during duels, particularly around corners and during close-range angles where seeing an enemy early is everything.
The core idea is straightforward. Less gun on screen means more information. During a tight peek around a corner, the difference between spotting an enemy’s foot early and reacting versus having your rifle barrel block that pixel can genuinely matter. It costs nothing to optimize, and the adjustment takes minutes.
Key CS2 Viewmodel Console Commands
All viewmodel adjustments are made through the developer console. Open it with the tilde key and use these commands directly.
- viewmodel_fov [54–68] — Controls the field of view of the weapon model. CS2 technically allows values up to 90, but most competitive players stay between 54 and 68, values much above 68 start looking unnatural. Lower values pull the weapon model in tighter and smaller, which means less of it sits in your direct line of sight during peeks and close-range duels. Higher values push the gun further toward the edge of the screen but can eat into how natural the model looks. Default is 60; most players who adjust this go to 68.
- viewmodel_offset_x [-2.5 to 2.5] — Horizontal position of the gun model. Negative values shift it left, positive values shift it right.
- viewmodel_offset_y [-2 to 2] — Depth — how close the model sits to the camera. Negative values pull it closer to the camera.
- viewmodel_offset_z [-2 to 2] — Vertical position of the weapon model. Negative values lower it, positive values raise it. Lowering the model is generally what you want for maximum visibility.
- viewmodel_presetpos [1, 2, or 3] — A shortcut instead of manually tuning x/y/z offsets. 1 is a low/desaturated position, 2 is the classic CS:GO-style position, 3 is the maximum FOV and maximum visibility position. A useful starting point before fine-tuning manually.
These commands work in any game mode without sv_cheats enabled, so you can test them live in a competitive match or on a private server.
Popular Viewmodel Presets Used by Pro Players
Professional CS2 players overwhelmingly favor viewmodel settings that minimize screen obstruction. The goal across all of these adjustments is the same: reduce how much of the weapon model blocks your view of where enemies will appear. The most common configuration pushes the gun to the far left corner at a high FOV, leaving as much of the center and right side of the screen clear as possible.
A widely used pro-style setup looks like this:
- viewmodel_fov 68
- viewmodel_offset_x -2
- viewmodel_offset_y 2
- viewmodel_offset_z -2
This combination pushes the weapon model low and to the left while maximizing the field of view, closer to preset 3 in spirit, but manually tuned. Some players prefer a slightly more centered position for aesthetic reasons or because the far-left offset feels disorienting at first. The classic preset (viewmodel_presetpos 2) is a reasonable middle ground if the full custom offset feels too extreme. There is no single universally correct setup, but the direction most competitive players consistently move in is toward less gun on screen.
How to Find Your Best Viewmodel Setup
Start with viewmodel_presetpos 3 to get the maximum FOV baseline, then adjust the offset values from there. The easiest method is to open a private server, apply your viewmodel commands, then walk around and peek common angles to see how the gun sits during movement and while holding positions.
Pay attention to two things specifically: how much of the right side of your screen the gun blocks during left-side peeks, and whether the weapon model feels visually stable during movement. Some players find very low Z offsets feel disconnected from the game. If that bothers you, raise the Z value slightly until it feels grounded without blocking too much of the screen.
Saving and Applying Viewmodel Settings Permanently
Typing viewmodel commands into the console each session is not practical. The correct way to make these settings permanent is through your autoexec.cfg file.
Navigate to your CS2 config folder, typically found at SteamsteamappscommonCounter-Strike Global Offensivegamecsgocfg. Open or create a file called autoexec.cfg and add your viewmodel commands there, one per line. Then add the line host_writeconfig at the bottom to ensure the config writes on load. In your CS2 launch options via Steam, add +exec autoexec to make sure the file runs every time the game launches.
Once this is set up, your viewmodel position loads automatically every session regardless of updates or config resets. If you ever want to share your setup or try someone else’s, the same commands paste directly into the console for instant testing, and you can update your autoexec whenever you land on a configuration you want to keep.
Viewmodel settings are a small part of a complete CS2 configuration guide, but they are one of the few adjustments that directly affect how much of the game you can see. Set it once properly and you will not think about it again. If you are also building out your loadout to match your setup, Skinvault’s inventory updates regularly and lists float values on every item, which makes it straightforward to find the specific condition you want without guessing.