For CS2 enthusiasts looking to refine their gameplay, mastering the jumpthrow bind is a game-changer. This technique allows you to throw grenades with precision and consistency, making it a valuable skill in competitive play. In this guide, we’ll walk you through the steps to set up the jumpthrow bind in CS2.
Understanding the Jumpthrow Bind
The jumpthrow bind is a command that players can input into the CS2 console to automate the action of jumping and throwing a grenade with a single key press. This ensures that grenades land in the same spot consistently, which is crucial for strategic plays.
Jumpthrow Bind: Option 1 – Console Command + Alias
One way to set up the jumpthrow bind is by using a console command combined with an alias. An alias is essentially a shortcut that allows you to execute multiple commands with a single input. Here’s how to set it up:
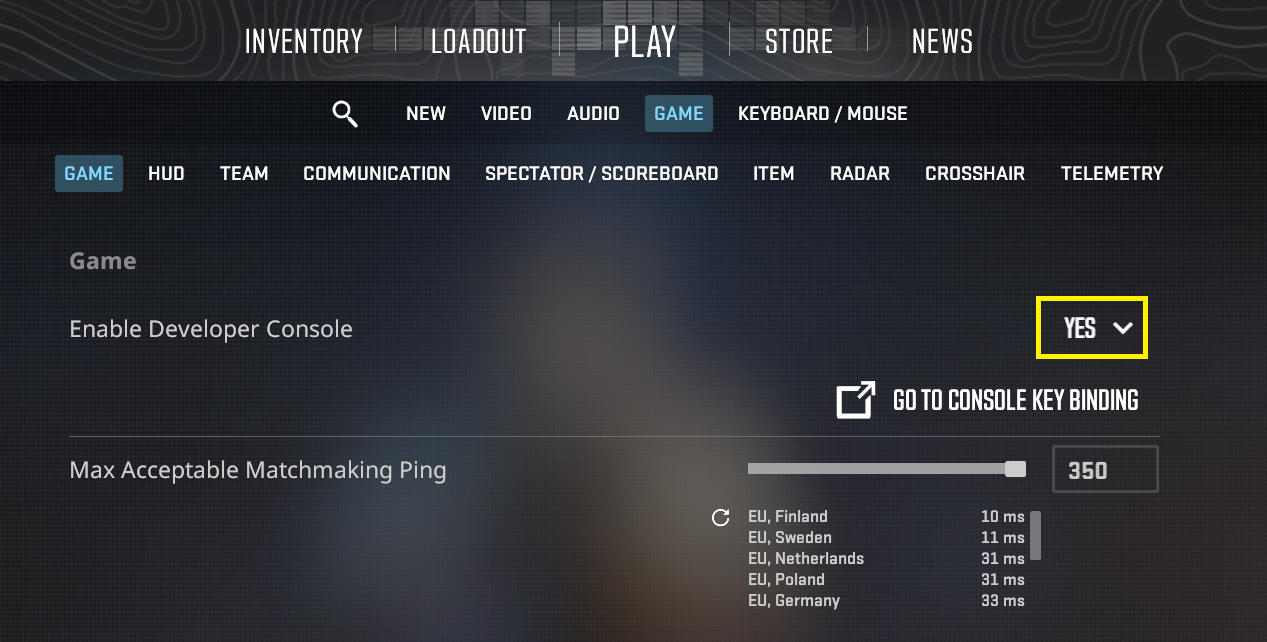
Step 1: Enable the Developer Console
First, ensure that the developer console is enabled in your CS2 settings. You can do this by going to the game settings and enabling the console under the game tab.

Step 2: Open the Console and Create the Alias
Next, open the developer console by pressing the tilde (~) key. Then, input the following commands:
bind "YOURKEY" "+jumpthrow"
alias "+jumpthrow" "+jump;-attack"
alias "-jumpthrow" "-jump"
Replace “YOURKEY” with the key you wish to assign the jumpthrow bind to. This command sequence creates an alias that executes the jump and throw action simultaneously.
Step 3: Execute the Bind
With the alias set, you’re ready to use the jumpthrow bind in-game. Simply press the key you assigned to the bind, and your character will jump and release the grenade at the peak of the jump.
Jumpthrow Bind: Option 2 – Autoexec Configuration
Alternatively, you can set up the jumpthrow bind through your autoexec.cfg file. This method ensures that the bind is automatically applied every time you start CS2.
Creating the Autoexec File
If you don’t already have an autoexec.cfg file, you’ll need to create one in your CS:GO directory. The file should be located in the cfg folder within the CS:GO installation path. Simply create a new text file, name it “autoexec.cfg”, and open it for editing.
Adding the Jumpthrow Bind to Your Autoexec
Within your autoexec.cfg file, add the same commands outlined in the console command method:
bind "YOURKEY" "+jumpthrow"
alias "+jumpthrow" "+jump;-attack"
alias "-jumpthrow" "-jump"
Remember to replace “YOURKEY” with your preferred key. Save the file, and the bind will be executed automatically each time you launch CS2.
Conclusion
Setting up the jumpthrow bind in CS2 can significantly improve your grenade throwing accuracy and consistency, giving you an edge in competitive matches. Whether you choose to set it up via console commands or through your autoexec.cfg file, mastering this technique is a step towards elevating your CS2 gameplay.


